A restaurant-worthy Healthy Shrimp Tower… made in your kitchen!
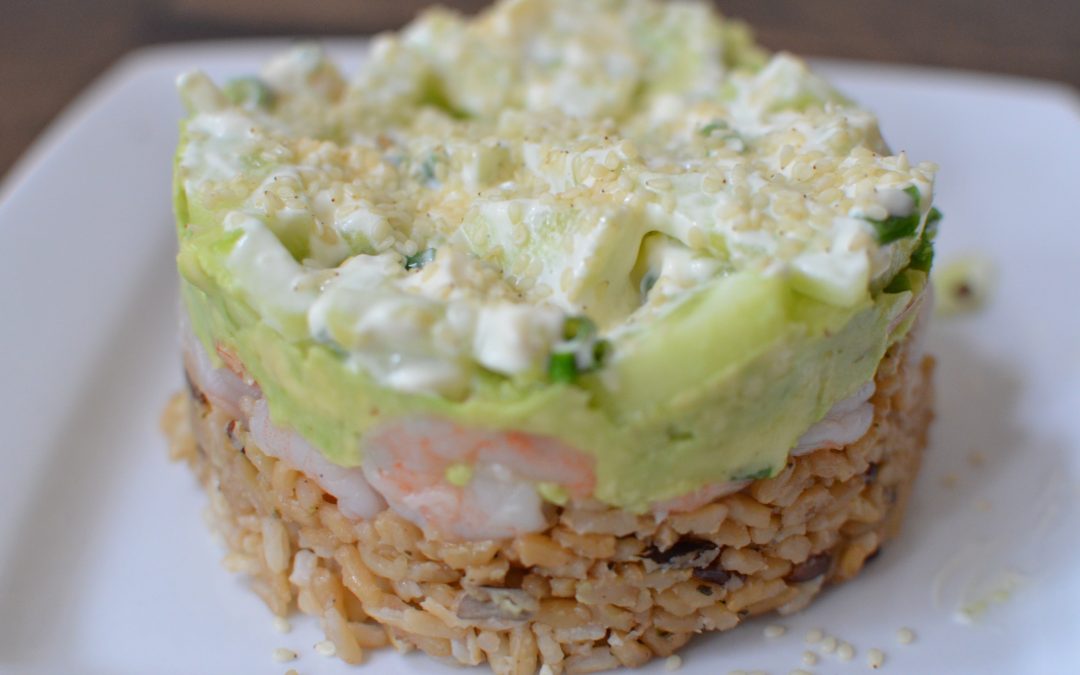
Doesn’t this Healthy Shrimp Tower look like something that only an experienced chef could make? Good news, it’s not! This recipe really only takes a few minutes to prepare and is a super healthy weeknight dinner option, or it can be lunch too. If the structure of the Healthy Shrimp Tower looks too difficult for you to recreate, you could just mix all the ingredients together in a bowl and serve. But, we do love the pretty presentation that is the result of stacking all the ingredients! We also love that this recipe uses shrimp, which is a March Foods of the Month.
What is the secret to getting the “tower” look? A measuring cup! Packing all the ingredients into a measuring cup makes this perfectly compact shrimp and brown rice tower. To save time, purchase precooked, tailed removed small shrimp and precooked brown rice. You will love the speed and ease of recreating this delicious and gorgeous meal in your own kitchen.
Using a round measuring cup with a handle, start to assemble your tower. It will be backwards. Use a spoon to firmly pack down the cucumber and mayonnaise miture. Next, add the avocado, then the shrimp. Use the spoon again to make sure they are packed in tightly.
Finally, add the brown rice, again using the spoon to make sure that everything is packed in tightly.
Carefully and quickly flip over the measuring cup with the ingredients onto a plate. If you packed it tightly enough, you will get a layer tower like the photograph.
Sprinkle with the sesame seeds and add an optional splash of soy sauce. Enjoy!
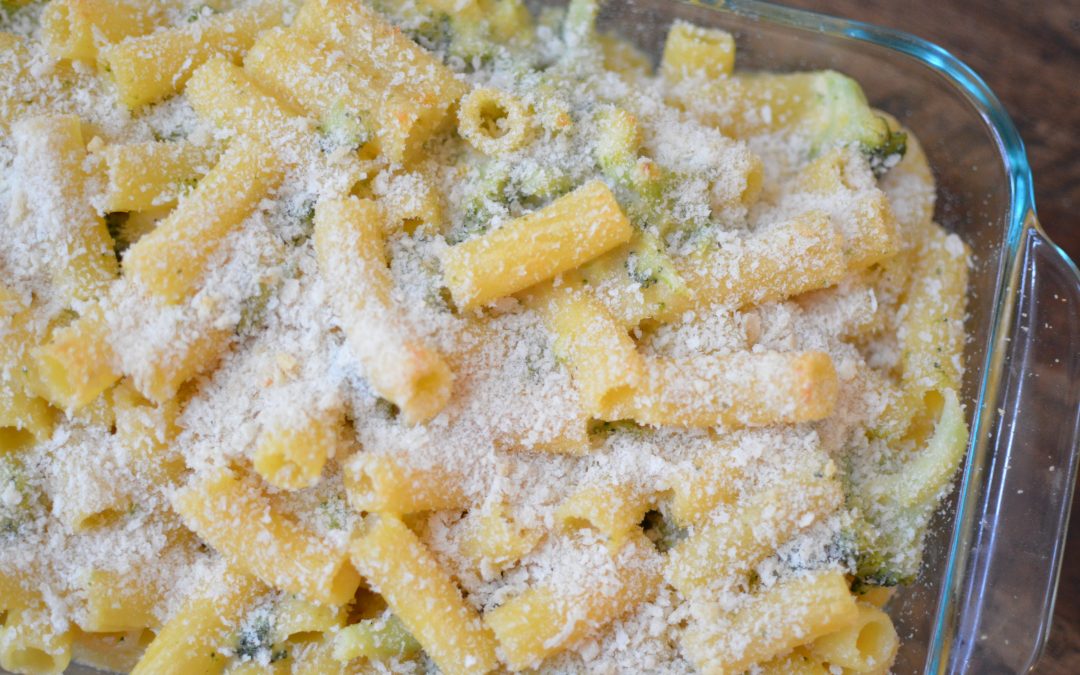
Do you ever find a recipe that you just LOVE and know will be part of your regular rotation? That is how we feel about this recipe for Greek Yogurt Mac and Cheese. It never would have occurred to us to put Greek yogurt in a cheese sauce, but now that we have tried it, it makes perfect sense! The Greek yogurt adds a good amount of protein to this dish. In February, we celebrate reduced-fat dairy as an OrganWise Guys Foods of the Month. Greek yogurt is considered reduced-fat dairy. And, so is the cheese found in this recipe!
What makes this recipe for Greek Yogurt Mac and Cheese special in our books? There are a few things. Using whole wheat pasta provides a good serving of whole grains and fiber. Every pasta dish is better with some added vegetables, we think. The broccoli provides some powerful antioxidants like Vitamin C, Vitamin A, and Vitamin B6. Broccoli is also a good source of calcium. Add in reduced-fat cheese and Greek yogurt and this is the perfect meal to keep your bones healthy!
The key to the tastiest cheese sauce is making it from scratch. This is called a roux. We used extra virgin olive oil (a good fat) instead of butter to keep this Greek Yogurt Mac and Cheese recipe a bit healthier.
Once you make this recipe one time and see how easy it is, you will be back for more. It’s the perfect kid-friendly dinner that can be on the table in a snap!
1 box whole grain pasta like elbows, bowties, or penne
1 10 oz. package frozen broccoli florets
2 tbsp. extra virgin olive oil
2 tbsp. all purpose flour
1/2 cup low-fat milk
2 cups reduced-fat sharp cheddar cheese, shredded (we like to shred our own but you can buy prepackaged)
3/4 cup low-fat, plain Greek yogurt
1/2 cup Panko breadcrumbs
Salt and pepper, to taste
Instructions
Preheat oven to 400 degrees.
Cook the pasta according to directions. After cooking for about 3 minutes, add the frozen broccoli florets. When pasta is al dente, drain and set aside.
Use a saucepan on medium heat to make the cheese sauce. Add the olive oil. When it begins to heat up, add the flour and mix together until smooth. Next, add the milk and mix. Finally, add the shredded cheese and mix well until no lumps remain.
Let the cheese sauce cool, then add the Greek yogurt. Mix well and season with salt and pepper.
Add the cheese sauce to the pasta and broccoli and mix together until the pasta and broccoli are coated in cheese.
Spray a small casserole dish or glass baking dish with nonstick spray. Add the pasta and top with panko breadcrumbs. Bake for 15 minutes, until the cheese is bubbly.
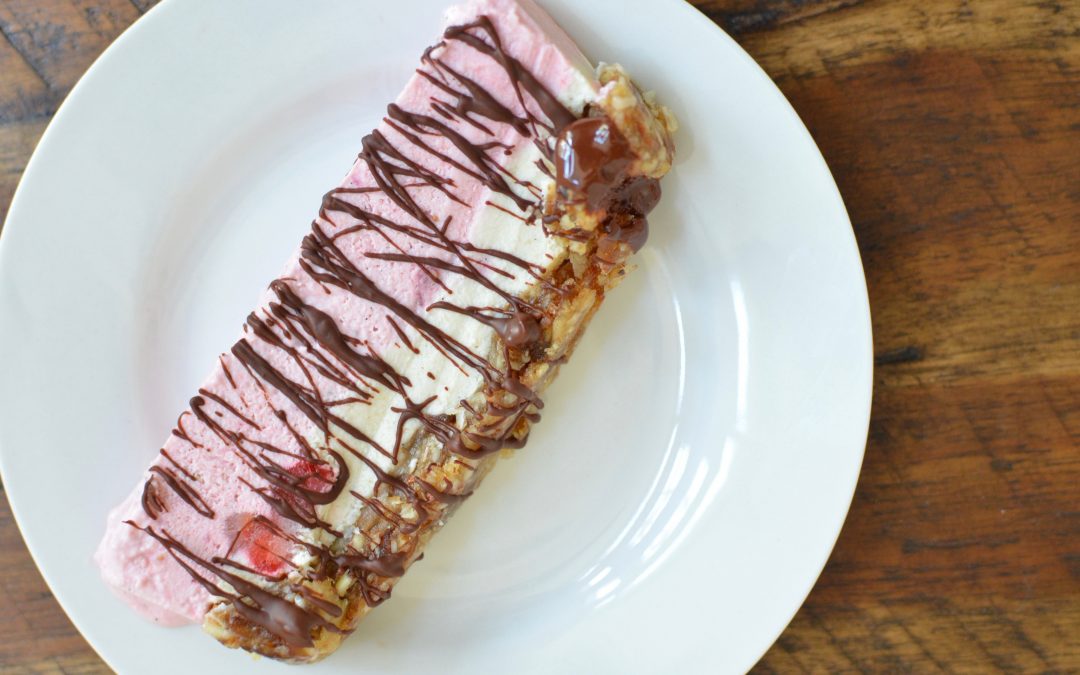
Happy Valentine’s Day! In honor of this holiday that celebrates all things love, we want to share with you a heart-healthy, body friendly dessert option. This may look decadent, but it’s incredibly healthy thanks to some tips from vegan cooking. Have you ever tried to cook vegan before? This Vegan Valentine’s Dessert is the perfect way to start if you are a newbie.
The photo of this dessert looks like cream, refined sugar, eggs and flour, right? Guess what? There is none of that in this recipe! Instead, this Vegan Valentine’s Dessert is made mostly with nuts and dates. We use almonds, cashews, coconut oil, coconut milk, dates, and a few other small ingredients in this recipe. That’s all! The beautiful pink color is not because of food coloring… it’s strawberry! Read below for this delicious and healthy Vegan Valentine’s Dessert recipe. You will love it.
2 cups raw cashews, soaked in a bowl of boiling water for 1 hour
1/4 cup coconut oil, melted
1/3 cup honey
The juice of 1 lemon
3/4 cup light coconut milk (including the cream from the top
1 vanilla bean, seeds scraped out or 1 tsp. vanilla extract
1 1/2 cup frozen or fresh strawberries, chopped
Instructions
Line a loaf pan with plastic wrap.
Using a food processor, process together the dates, almonds, coconut flakes and water. It should form a thick, sticky mixture that will be the "crust" for this dessert.
Once combined, transfer the crust to the loaf pan. Spread it (using a spoon on your fingers) in an even layer over the bottom of the bread pan. Refrigerate while you make your filling.
Next, make your filling. Using the food processor again, process together the cashews, coconut oil, honey, lemon and coconut milk. Process until a smooth, creamy mixture is formed. Add the vanilla and process again.
Remove the crust from the fridge, then pour half of the filling mixture over the crust (leave the rest in the food processor, you will use it later). Sprinkle 3/4 cup of the chopped strawberries over the mixture. Freeze for 1 hour.
Use the second half of the filling mixture to make the third, pink layer. Process together the mixture with the remaining 3/4 cup strawberries until it is pink. Remove dessert from freezer and pour the rest of the pink filling over the second layer.
Freeze for 3 hours. Remove, cut into slices and drizzle with melted dark chocolate. Enjoy!
Notes
Store this dessert in the freezer. It will melt like ice cream!
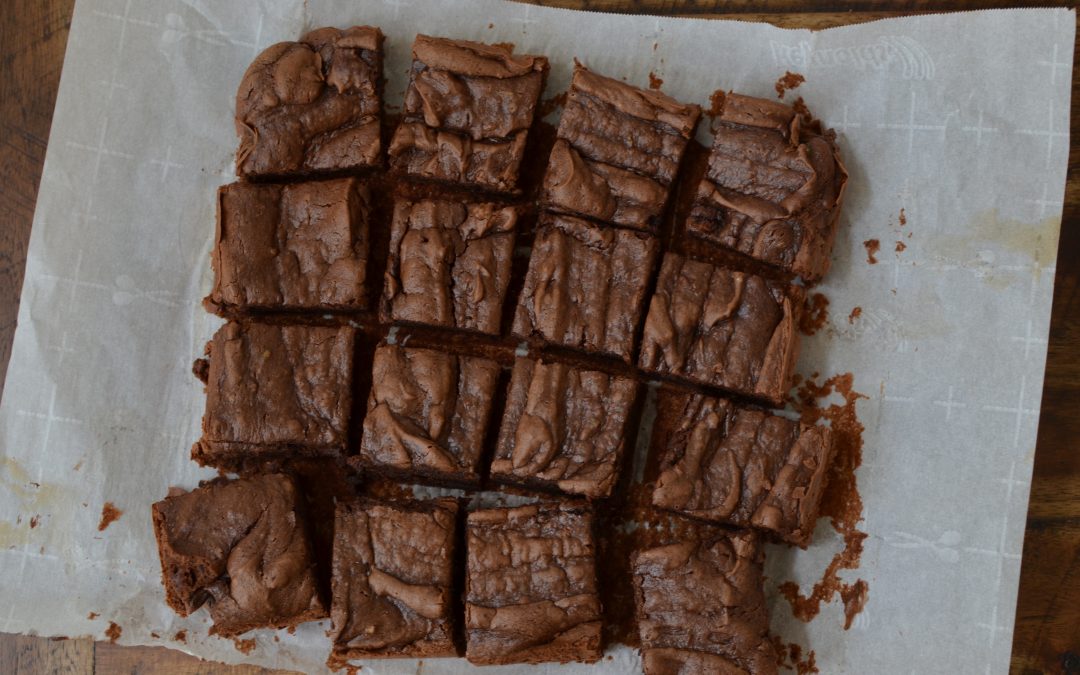
Are you not getting hungry just looking at this picture of our Avocado Brownies? Avocados, a type of good fat, are a February Foods of the Month. Did you know that you can use avocado instead of butter or oil in recipes for baked goods? That is exactly what we did in this recipe for Avocado Brownies!
The great thing about these Avocado Brownies is that they are packed with heart-healthy fats. The fat in avocado helps to lower bad cholesterol (LDL) while boosting good cholesterol (HDL). Additionally, avocados are full of additional nutrients that butter and oil lack. Think of these little vegetables are a food that is packed with fiber, potassium, Vitamin C and Vitamin B-6.
Another thing that we love about this recipe is that it is relatively low in sugar. By using applesauce and maple syrup, you can avoid adding any white sugar. If you want to boost the flavor even more, we recommend adding some dark chocolate morsels and walnuts to the existing recipe. The dessert is truly decadent and healthy!
Microwave the chocolate chips until melted, then use a mixer to combine with the wet ingredients (applesauce, maple syrup, vanilla extra). Crack in each egg, one at a time, to the wet mixture until they are well incorporated.
Add the mashed avocado to the wet mixture
Meanwhile, use a large bowl to mix the dry ingredients (flour, cocoa powder and sea salt). Add the dry ingredients to the wet ingredients and continue to mix until thoroughly combined, forming a batter.
Pour the batter into a a nonstick 9 x 9 pan lined with parchment paper and bake for 30 minutes, until a toothpick comes out clean.
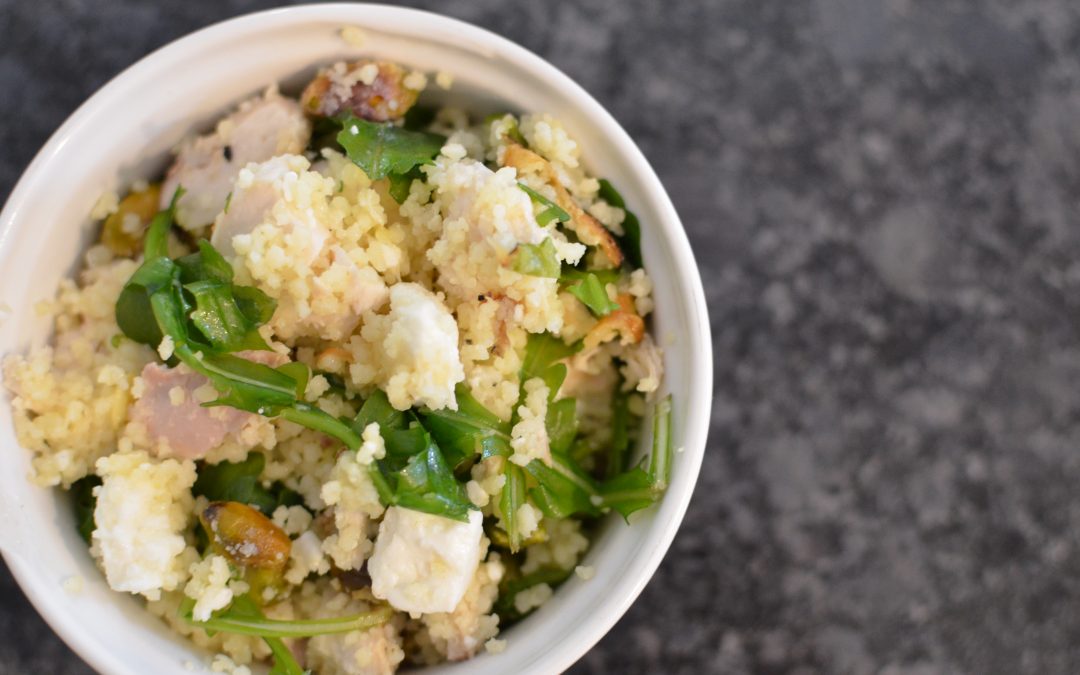
Have you made couscous before? This North African dish is known for “being so nice they named it twice!” Couscous are tiny balls of dried pasta that only take about 5 minutes to prepare. They make a great base for this Healthy Couscous with Feta recipe.
Feta cheese, with 6 grams of fat per ounce, is reduced-fat dairy, which is a February Foods of the Month. Feta has a salty taste that we love, especially when paired with the savory flavors in this Healthy Couscous with Feta recipe like lean chicken breast, zucchini and toasted pistachios. What also goes well with feta? Extra virgin olive oil, of course! There is a hefty dose of extra virgin olive oil (also a February Foods of the Month), in this recipe to keep you full while also promoting heart health.
This recipe takes only 30 minutes to prepare. It makes a large portion that can be enough for a family dinner plus leftovers. Or, make it as part of your weekly mealy prep and eat it for lunch for a week. The combination of ingredients in this Healthy Couscous with Feta recipe is one that you can feel good about eating.
Chop the zucchini and the summer squash into bite size pieces, drizzle with extra virgin olive oil, sprinkle with salt and cook for 25 minutes, until the vegetables are tender and slightly brown.
While the vegetables are roasting, make the couscous and the chicken.
Cook the chicken breasts using a nonstick pan on medium heat for 10 minutes until no pink remains. Let cool then shred with two forks.
In a saucepan, boil 2 cups of water. Add the couscous, remove from heat, cover, and let stand for 5 minutes. Fluff with a fork.
Using a large bowl, combine all the ingredients. All the couscous, chicken, feta, pistachios, and arugula. Mix together to combine. Add the extra virgin olive oil and salt, and mix again.
Once the zucchini and the summer squash have finished roasting, allow them to cool for 5 minutes then add to the couscous mixture and mix again to combine all ingredients.

 Save Recipe